CPVC pipe & fittings have been used in plumbing applications for many years, and with a positive track record. However, the advent of newer connection technologies (press for example) has impacted installation times; and as a result, installers are now looking at how the man-hours used impact their overall project costs.
All pipe preparations, regardless of the material, are essentially the same, and with various cutting tools, can be considered practically equal for the purposes of an impact to installation time.
Pipe Preparation:
| CPVC | PRESS |
| STEP 1: Apply 1-Step Solvent/Cement to the Pipe | STEP 1: Insert the Fitting Onto the Pipe |
| STEP 2: Apply 1-Step Solvent/Cement to the Fitting | STEP 2: Hold the Press Tool and Place the Jaws Over the Fitting |
| STEP 3: Re-Apply 1-Step Solvent/Cement to the Pipe | STEP 3: Press the Trigger |
| STEP 4: Insert the Fitting Onto the Pipe (Approx. Time for Above = 30 Seconds) | STEP 4: Once the Cycle is Complete, Remove the Jaws from the Fitting |
| STEP 5: Hold Fitting in Place for 30 Seconds | |
| TOTAL APPROXIMATE TIME = 1 MINUTE | TOTAL APPROXIMATE TIME = 30 SECONDS |
NOTE: Some Solvent/Cement Manufacturers state you need to wait 15 minutes before handling of the connection.
This example shows how press has cut the installation time for each connection, when compared to CPVC, by approximately half. In addition, this example is only one half of any given joint in the system as each fitting has two-sides.
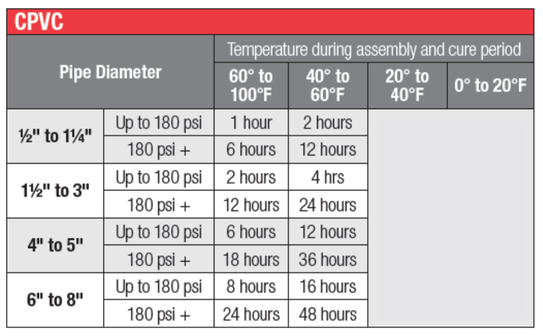
Even though both above Joint are considered "complete", there is still another major step that must be taken into consideration before the entire system can be considered "complete"; the leak/pressure test. This is where the bigger impact to the overall project installation time is impacted by the time required for CPVC to fully cure before any leak testing can occur.
Once the jaws are removed from the press fitting, that fitting is ready for a leak/pressure test (provided the system is closed and has a test port accessible). For CPVC, the cure time must be factored into this equation before the fitting is ready for the leak/pressure test (again, provided the system is closed and has a test port accessible).

Reference: Oatey at https://www.oatey.com/sites/default/files/2020-11/01_SolventWeldCureTimes_CureChart_LCS358G.pdf
This data is applicable only for new piping installations and not recommended for repair or cut-ins on hot and cold water distribution systems.
DO NOT test PVC and CPVC piping systems with compressed air or gas.
NOTES: Cure schedule is the time required before pressure testing the system
- This chart can be used as a guideline to determine joint cure
- Cure times stated are for conditions with relative humidity of 60% or less
+ In damp or humid weather, allow 50% additional cure time
+ Always consult your engineering and project teams prior to any installation
As the above chart shows, it is possible to have a required 36 hour cure time for a 1.5" fitting (24 hour plus 50%). While this additional time may not directly impact the individual installers, it does directly impact the overall project completion time.
Press systems allow for the use of low pressure air, as well as water, when performing leak/pressure tests. CPVC does not allow for the use of air when performing these tests. Filling the system with water, and then draining it, is yet another process that impacts the overall project completion time.
Taking this information into consideration shows how all of the required installation steps have a direct impact to the man-hours used to calculate the overall project cost. Furthermore, this has shown where press fittings have an advantage to CPVC when considering the installation time and overall project cost.
3/28/2025 11:31:29 AM